Friday Q&A: The Safety of Headstand (Sirsasana)

Q: There is a lot of controversy these days about the safety of Headstand. What is your opinion about its safety?

A: Just recently, I read an article by Grace Bullock, Ph.D., E-RYT 500, Headstand and Neck Safety in Yoga: What You Need to Know about a recent study Sirsasana (headstand) technique alters head/neck loading:Considerations for Safety in the Journal of Bodywork & Movement Therapies.

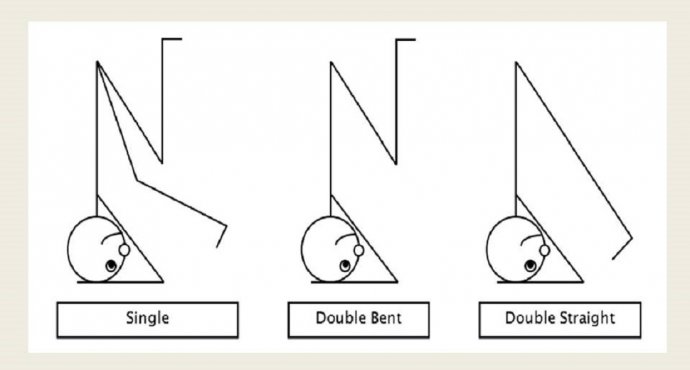
In the study, researchers in Austin, Texas, observed a group of experienced yoga practitioners entering Headstand (Sirsasana), maintaining the pose for 5 breaths, and then exiting the pose, using specialized techniques and technology to measure the forces at work on the neck and head area. The practitioners had one of three ways of moving into Headstand, as shown in the illustration above: 
  1. straight legs going up together
  2. bent knees going up together
  3. bent knees, going up one at time

In all three groups, the amount of weight born by an individual’s neck and head was 40-48% of his or her total body weight. This is in contrast to the assertion is often made by yoga teachers that in this pose the neck and head bear very little of the body weight and the arms bear most of it. Now, can you imagine a 163 lb. person, like me, regularly carrying a 65-78lb. weight around on the top of his head and it not leading to problems in his neck?

They also observed that the longer the practitioners were in the pose, the more weight their heads and necks were bearing, and they were only in the pose for 5 breaths, around 30 seconds or so. Now, most classes I attend that include Headstand have you in the pose for a minimum of two minutes. So, using myself as an example again, this would mean that as time goes on the weight on my head might start to be more like 80-90 pounds.

The investigators also were able to observe side-to-side shifting of the weight on the head and neck during all three the phases of the Headstand, and although it was less noticeable in those that could go up and down with both legs straight, this side-to-side shifting did happen in all three methods of moving into and out of the pose. And the more side-to-side shifting that occurs, the higher the risk of injury is to the neck structures and tissues.

Keeping in mind that these were all experienced practitioners in the study, I can surmise that new and inexperienced practitioners are likely to be putting much higher pressures on their necks and have a lot more shifting of the weight on their necks in the learning process, thereby increasing their chance of injury.

Following an incident where my car met a deer on a country road a few years back, my neck did not come out of the encounter unscathed. So I have let go of Headstand, as it typically worsens my neck symptoms. I have also dropped it from my teaching because of my concern that the risks of doing full Headstand outweigh its benefits, especially in light of the safer poses I can substitute in its stead, such as Forearm Balance (either Pinca Mayurasana or “Headless Headstand”) or using a Headstander prop. Forearm Balance and using a Headstander provide some of the same benefits of an inversion that Headstand provides, reversing the blood flow and encouraging return of venous and lymphatic fluids, all without the risk of cervical injury. In addition, using the Headstander prop for longer holds adds the calming and grounding effects some people experience with Headstand.

So this new study confirms my personal and professional preference in this regard. And, in her article, Grace points out several other contraindications to doing Headstand that are important to remember: osteoporosis/osteopenia, hypertension, glaucoma, detached-retina, pregnancy, menstruation, cervical injury or dysfunction, heart conditions, or other serious medical diagnoses.


Regular readers of our blog know that I believe yoga is generally safe and well tolerated by most people. But there may be a few exceptions, such as Headstand, where we need to be more discriminating about who learns and practices it. If you are going to practice Headstand, you may want to work towards the straight legs entry and exit, as that method had slightly lower pressures on the neck than the other two ways. Grace provides some good guidelines in her article, which I agree with, that you can check out on your own at Headstand and Neck Safety in Yoga: What You need to Know.

—Baxter

Subscribe to Yoga for Healthy Aging by Email ° Follow Yoga for Healthy Aging on Facebook ° Join this site with Google Friend Connect

How You Feel About Aging

by Nina
 “Scientists are discovering something very peculiar about aging: How we feel about getting old matters. A lot. In test after test, researchers are finding that if we think about getting older in terms of decline or disability, our health likely will suffer. If, on the other hand, we see aging in terms of opportunity and growth, our bodies respond in kind.” —Anne Tergesen from “To Age Well, Change How You Feel About Aging.”

I think we all understand that the tendency of media to portray only thin, young white females doing yoga is not a good thing, as it makes people who don’t fit into that limited category (most of the world’s population!) feel as if yoga might not be for them. And, of course, that’s sad because this stereotype of who can do yoga means that a lot of people who could benefit from the practice will be missing out. But now I’ve learned that these kinds of stereotypes can be particularly harmful to older people. According to a recent article in the Wall Street Journal To Age Well, Change How You Feel About Aging (which cited several scientific studies), negative stereotypes about aging affect the beliefs of older adults about the aging process, potentially causing them to do serious harm to their health without realizing it. 

“Scientists aren’t sure exactly how holding negative stereotypes affects health, but they say it’s clear that there is a connection, and it isn’t simply correlation. In test after test, negative stereotypes have been shown to lead to poor health results. Over the past two decades, dozens of studies from psychologists, medical doctors and neuroscientists have shown that older people with more negative views of aging fare more poorly on health than those with less-pessimistic attitudes.

“Even when study participants have similar health, education levels and socioeconomic status, those with more negative outlooks about aging show greater declines in a variety of areas over time. They have shakier handwriting, poorer memories, higher rates of cardiac disease and lower odds of recovering from severe disability, according to studies by Prof. Levy. They are less likely to eat a balanced diet, exercise and follow instructions for taking prescription medications as they age. They even die younger—the median difference in survival rates is 7.5 years.”

Well, all that certainly makes me feel good about our ongoing photo contest, showing people over 50 doing yoga (see Photo Contest Open for All People Over 50). But, of course, a single photo contest isn’t going to counteract the negative stereotypes of older people we are bombarded with on a daily basis, whether it’s through exclusion (lack of older women in Hollywood movies, for example) or through portrayals that show older people as ridiculous or incapable. So what can we do about this?

The Wall Street Journal article actually provided four steps for counteracting these negative stereotypes. Because each step relates directly to a yogic concept or technique, I’m going to summarize the steps for you here, adding my own interpretations about how they relate to yoga (see  To Age Well, Change How You Feel About Aging for complete information on the steps). 

1. Understand the myths vs. the facts. Rather than simply accepting received wisdom about what getting older means, you should actively inform yourself. In yoga, educating yourself is an important aspect of svadhyaya, or self study (see The Power of Svadhyaya (Self Study), Part 2). On our blog, we’re providing you with a wealth of information about what is known about the aging process and how yoga can help foster healthy agiing. But reading more general information about aging and health elsewhere seems like a good idea. I was interested to read in “To Age Well, Change How You Feel About Aging,” that “our moods, relationships and overall sense of well-being actually can improve with age, as can knowledge and certain types of intelligence.” I know that this had been my own experience, but it was good to learn that other older people in general have similar experiences.

2. Recognize stereotypes in everyday life. Because we are bombarded by negative views of aging without being aware of it (the ads during a football game come to mind), paying attention is an important way to lessen the impact. So if you haven’t been observing this phenomenon, start by noticing. The next step is to become more aware of your own thoughts about older people and aging. This is another form of svadhyaya (see The Power of Svadhyaya (Self Study), Part 1). Use your witness mind to observe your thoughts regarding aging, particularly noticing the stereotypes you yourself have regarding aging and whether you tend to blame things automatically and reflexively on age. 


3. Substitute positive images for negative stereotypes. After you’ve noticed the negative stereotypes in the culture at large as well as in your own mind, you can actively counteract them by intentionally searching for better role models, whether they are older family members or friends or people in public eye. This step directly ties into the yogic concept of pratipaksa-bhavanam, or cultivating the opposite, which I discussed in my post The Biochemical Basis for Gratitude:

II.33 Upon being harassed by negative thoughts, one should cultivate counteracting thoughts. —translated by Edwin Bryant 

Here’s are some photos to get you started. 
Nonnina Victoria, Age 101
George Boskoff, Age 90
Or, maybe you just need to look in the mirror. I’ve seen your photos, yoga friends, and you’re all looking pretty wonderful.

4. Accept the aging process. Of course, it is also important not to expect an entirely positive experience of aging because that is as unrealistic as expecting only a negative experience, and so is bound to bring difficulties. As Anne Tergesen put it, “The key is to hold both positive and negative in balance and really understand and own the aging process.” That sounds like the niyama santosha (contentment), which TKV Desikachar defined as:

“Contentment or the ability to be comfortable with what we have and what we do not have.” —TKV Desikachar

See Yoga Philosophy: Contentment for information about cultivating contentment.

Interestingly, according to Anne Tergesen, one good way to cultivate contentment with the aging process is by exercising. She cites a 2012 study Views on aging and emotional benefits of physical activity: Effects of an exercise intervention in older women that showed exercise can cause people feeling better about the aging process, saying, “These women were more physically fit, more alert and had better executive functioning. The positive experience of exercising affected their well-being and improved attitudes about aging.” So practicing asana, which tends to make people feel good in general, is also going to help you feel better about the aging process.

Fighting the negative stereotypes in our culture about aging and older people isn’t necessarily an easy task. But, fortunately, as you can see, yoga provides a wealth of options for helping us to feel differently about aging, including our asana practice as well as mindfulness practices, cultivating the opposite, and contentment practices.

Subscribe to Yoga for Healthy Aging by Email ° Follow Yoga for Healthy Aging on Facebook ° Join this site with Google Friend Connect

Proof of the Effectiveness of Yoga for Incontinence

by Ram

Urinary incontinence (UI) is loss of bladder control and is more commonly seen in aged people. While it is a problem in both genders, women experience UI twice as often as men. Men leak urine, too, but the problem is more common in women. Leakages happen when women exercise, laugh hard, cough, sneeze, or when they are pregnant. While some individuals experience occasional minor leaks, others wet their clothes frequently. Incontinence is not a disease but it may indicate an underlying pathological issue and hence requires intervention. Nearly one third of women aged 40 years and older experience urinary incontinence, together with associated conditions, including depression, falls, and fractures, social isolation, and physical inactivity.

UI happens when the bladder muscles become too weak or overly active. The bladder is a balloon-shaped, reservoir-like muscular organ that stores and releases urine. It is supported and held in place by the pelvis. The channel that carries urine from the bladder is called the urethra. Ring-like muscles called sphincters help keep the urethra closed so urine doesn't leak from the bladder before you're ready to release it. Several bodily systems must work together to control the bladder: pelvic floor muscles hold the bladder in place, sphincter muscles keep the urethra closed, the bladder muscle relaxes when urine collects in the bladder and squeezes when it's time to urinate, a set of nerves carry signals from the bladder to the brain know when the bladder is full, and efferent nerves carry signals from the brain to the bladder when it's time to urinate. UI problems occur when any of the above-mentioned features mentioned fail to work optimally. 

Types of urinary incontinence include:
  • Stress incontinence. “Stress" is the pressure on the bladder when an individual coughs, sneezes, laughs, or lifts something heavy. If the pelvic and sphincter muscles are strong, they can handle the extra pressure. However, when those muscles get weakened, the sudden pressure pushes urine out of the bladder causing a leak.
  • Urge incontinence. If you experience involuntary loss of urine after a strong, sudden urge to urinate, you have urge incontinence. Urge incontinence may be caused by a minor condition, such as infection, or a more severe condition, such as nerve damage, a stroke or an infection.
  • Overflow incontinence. An individual experiences frequent or constant dribbling of urine due to a bladder that doesn't empty completely.
  • Functional incontinence. A physical or a mental condition that prevents the individual from reaching the bathroom in time to urinate.
  • Mixed incontinence. A mix of stress and urge incontinence. 
Although a variety of clinical therapies for incontinence are available, many have limitations particularly for older women who are at greatest risk of developing this condition. Drugs, including anti-cholinergic medications, are moderately effective in reducing urge incontinence, but are associated with several side effects. For stress incontinence, surgery is an effective option, but most women do not desire or are not candidates for surgical intervention. Pelvic-floor muscle exercises and bladder training can be highly effective, but can be difficult for some women to learn without individualized instruction. Thus, there is a need for effective, alternative treatment that is not only accessible but also well tolerated by the large number of incontinent individuals. 

Yoga can be used to help incontinent individuals to identify and strengthen their pelvic floor muscles without traditional pelvic floor rehabilitation. There are several yoga poses that may be beneficial for improving hip and lumbo-pelvic stability, mobility, and alignment, as was described by Shelly Prosko in her two-part series To Leak or Not to Leak and Treatment of Incontinence

Not surprisingly, there are quite a few evidence-based research studies on the management of incontinence with yoga. But I was especially impressed with the rationale and results from one particular study that was published a year ago A group-based yoga therapy intervention for urinary incontinence in women: a pilot randomized trial. Despite the small sample size, the study was published in a peer-reviewed journal, suggesting that the reviewers saw merit in the results. Let me also add that despite being a small pilot study, the results were highly significant with minimal variation between the yoga group and non-yoga group. The rationale for doing the study was to check the feasibility, efficacy, and safety of yoga therapy for middle-aged and older women with urinary incontinence. The exclusion criteria were stringent and elaborate, and excluded individuals who displayed severe mobility or if they already underwent yoga instruction within the past year specifically to treat incontinence. Other exclusion criteria included but were not limited to: pregnancy within the past 6 months, ongoing urinary tract infection, neurological issues, including stroke, multiple sclerosis, or Parkinson’s disease, a congenital condition leading to incontinence, fistula in the bladder or rectum, and pelvic cancer or radiation among others. 

Women were randomized assigned by a computer to two groups: a yoga group (N=10) and a non-yoga waitlist group (N=9). The non-yoga group received a gift certificate for local yoga studio classes at the end of the study (I thought this was a novel way to inspire them to do yoga especially after the encouraging results). The yoga group was enrolled in a 6-week yoga therapy program consisting of two group classes/week led by an experienced, certified instructor as well as an assistant and one weekly home practice. The yoga program designed by Judith Lasater and Leslie Howard focused on providing formal instruction and practice in a variety of yoga postures and techniques. The program, which was based primarily on Iyengar yoga, involved a set of eight postures that could be adapted for women of all ages, including those with decreased flexibility or mobility. It included: Tadasana (Mountain pose), Utkatasana (Powerful pose), Trikonasana (Triangle pose), Malasana (Garland pose), Viparita Karani variation (Legs Up the Wall pose), Salamba Setu Bandhasana (Supported Bridge pose), Supta Baddha Konasana (Reclined Cobbler’s pose), and Savasana (Corpse pose). See the end of this post for photos of the sequence.

Emphasis was laid on strengthening the pelvic floor structures and increasing control over the pelvic floor muscles, in addition to improving general fitness and conditioning, and promoting mindfulness, deep breathing, and relaxation. Participants were also given yoga props and a manual with written descriptions and pictures depicting each of the key yoga postures. Tips were provided on ways to practice each posture safely and comfortably to improve incontinence and pelvic floor function. 

The results from the study were quite impressive. The authors noted the following: 
  1. Teaching women to practice yoga to improve their incontinence was achievable and safe, adherence to group yoga classes and home yoga practice was high, and all the participants were quite successful in learning to practice program-specific yoga postures and techniques.
  2. The women who did yoga experienced an overall 70% reduction in the frequency of urine leakage, in both total and stress-type incontinence. 
  3. The positive change was most notably seen in situations involving stress incontinence, urine leakage triggered by activities that increase abdominal pressure, such as coughing or sneezing.
  4. Behaviorally, there was significantly greater improvement in the annoyance of their symptoms, compared to non-yoga participants.
While the authors do note that the primary limitations of the study were a small sample size and a short duration of yoga practice (6 weeks), nevertheless, the study supports the feasibility, efficacy, and safety of yoga therapy to improve urinary incontinence in ambulatory, middle-aged and older women without complicated urologic histories. Since anxiety and depression are often associated with urinary incontinence, the researchers also believe that the yoga's benefits may relate to its emphasis on meditation and relaxation. Additionally, yoga can be practiced by women without continuous or ongoing supervision, thus offering a cost-effective, home-based, self-management strategy for women with incontinence.

Poses from the study follow (we're not sure about exact propping that was used):


Tadasana
Utkatasana
Trikonasana
Malasana
Viparita Karani
Salamba Setu Bandhasana
Supta Baddha Konasana

Savasana

Photos courtesy of Melina Meza from her book Art of Sequencing: Asana Modifications.

Subscribe to Yoga for Healthy Aging by Email ° Follow Yoga for Healthy Aging on Facebook ° Join this site with Google Friend Connect

Featured Pose: Cobra Pose (Bhujangasana)

by Baxter
Although Cobra pose (Bhujangasana) is often the first active backbend that many beginners encounter, that doesn’t mean there isn’t a lot to this famous snake! Depending on the version you are practicing, Cobra is a great way to strengthen your upper back your middle and upper, or the entire length of the muscles from your pelvis to the back of your head. Because you are actively pressing your hands or forearms into the floor and lifting your chest up, you are also strengthening and stabilizing the area around your shoulder joint and shoulder blades, an area where a lot of people are weak. And because you are taking your back into a backbend, you are inviting stretch and flexibility into the front of your body, in this case from your front hips to your chin. 

I prescribe this pose for:
  • Upper back stiffness
  • Rounding forward of the upper back (kyphosis)
  • Poor Posture
  • Upper body strength
  • Improving overall spinal mobility and flexibility
  • Energizing yourself when you are fatigued
  • Uplifting yourself when you are mildly depressed 
  • Counter-pose for forward bends and twists
Cautions: This is generally a well-tolerated pose. But if you have arthritis of the neck area or lower back pain that is aggravated by backbends, you may need to skip this pose and instead practice supported backbends, such as those described at Featured Pose: Supported Backbend. For those experience a feeling of mild discomfort or vulnerability in your lower back, firming your belly towards your spine while in the pose can sometimes eliminate the problem. If you have a hernia in the front belly area be cautious that this does not make them worse. Bridge pose, where gravity is opposite, may be a better backbend for you. And if you have wrist, elbow or shoulder issues and doing this pose makes your symptoms worse, do a modified version that reduces impact on the problem area.

Classic Pose (High Cobra)
Compared to our other variations, the classic version of Cobra pose creates the largest overall backbend in your entire spine, maximizing back muscle strengthening and front body lengthening. It also strengthens your arms and shoulders more than the other versions. To keep your wrists safe, it is important to position your shoulders over your wrists, but no further forward.

There are two ways of getting into the pose: from Downward-Facing Dog pose (Adho Mukha Svanasana) and from lying on your belly.

To come into the pose from Downward-Facing Dog pose, swing your shoulders directly over your wrists into Plank pose. If your hips are way up in the air in Plank, wiggle your feet back a few inches until your shoulders and heels are in one long line. Next, keeping your arms straight, swing your hips and knees forward and down, allowing for a slight bend in your knees so your legs can come to rest on the floor, with your pointing your toes back. 

As you swing into place, turn your chest forward and float your head above your shoulders, gazing straight ahead. Double check to make sure your shoulder/wrist alignment is safe, and press down firmly into the palms of your hands as you lift up through your arms into your shoulders. If you are not flexible enough to fully straighten your arms while keeping your legs on the floor (your pubic bone can lift off slightly), allow your arms to bend as necessary. 

Move your shoulder blades down your back (rather than allowing them to hunch up toward your ears) and firm them against your back to open your chest. Widen your collarbones away from your breastbone.

Stay in the pose for 6 breaths initially, but work up to longer holds over time. To come out of the pose, by bending the elbows and lowering down onto your belly and chest, or turn your toes under, lift your hips up and swing back into Downward-Facing Dog pose.

To enter from a prone position, start by lying face down on the floor with your toes pointing back and the tops of your feet resting on the floor. Rest on your forehead or chin on the floor. Now, bend your elbows and place your hands palm down, fingers pointing forward, by the sides of your rib cage, half way between your shoulders and your lower ribs (you may have to play with your hand position to get the right shoulder/wrist alignment in the full pose). In this position, your arms will look like grasshopper legs. To come into the backbend, press your palms down and begin to straighten your arms, slowly rolling up until you are positioned in classic Cobra pose as described above, with your legs lengthening along the floor. If you are not flexible enough to fully straighten your arms while keeping your legs on the floor (your pubic bone can lift off slightly), allow your arms to bend as necessary. Work with your shoulder blades and collarbones as described above.

As in the previous version, stay in the pose for 6 breaths initially, but work up to longer holds over time. To come out of the pose, bend your elbows and lower back down onto your belly and chest. Then, slide your arms by your sides, turn your head to one side, and gently rock your hips side to side if that feels like a relief for your hips and lower back.


Sphinx Pose

(Sorry, not photo. See "Sphinx with Palms Together" below to get the general idea.)

I recommend this version for those starting off with stiffness or weakness, as well as for those with wrist issues but healthy shoulders. 

To set up for the pose, start on your belly as in classic Cobra above, with your hands on the floor about in line with your shoulders. To come into the backbend, press into your hands just enough to roll up about six inches off the floor. As you come up, with your forearms parallel, slide your hands and forearms forward onto the floor until your elbows are under your shoulder joints. Press your forearms down into the floor while lifting your chest up, moving your shoulder blades down your back, widening your collarbones, and bringing your head to a neutral position over your shoulders. 

Stay in the pose for 6 breaths initially, but work up to longer holds over time. To come out of the pose, slide your elbows out to the sides as you lower your chest and head down to the floor. Then, slide your arms by your sides, turn your head to one side, and gently rock your hips side to side if that feels like a relief for your hips and lower back.

Low Cobra

This version is great for those newer to yoga who need to strengthen their upper backs more than other sections of the spine and who may have general stiffness in the wrists. 


To set up for the pose, start on your belly as in classic Cobra above, with your hands on the floor about in line with your shoulders. To come into the backbend, press into your hands just enough to roll up about six inches off the floor. Use your back muscles to keep you in this lower position, with your hands just lightly pressing into the floor, your elbows bent and parallel to the sides of your body. Be mindful to lift your head into the general curved arch of the backbend without throwing your head back dramatically (a common mistake I see with beginners). Work with your shoulder blades and collarbones as described above.

Stay for 4-6 breaths initially and gradually work up to longer holds. To come out of the pose, lower down onto your forehead or chin. Then, slide your arms by your sides, turn your head to one side, and gently rock your hips side to side if that feels like a relief for your hips and lower back.


Sphinx with Palms Together

This variation is essentially the same as Sphinx pose above, except your touch your palms with your forearms on the floor. That simple adjustment makes this version easier on your shoulders, especially for those with rotator cuff injuries. 

To come into the pose, use the same steps as for Sphinx above, but instead of keeping your forearms parallel, bring your palms together. Work with your shoulder blades and collarbones as described above.

Stay in the pose for 6 breaths initially, but work up to longer holds over time. To come out of the pose, slide your elbows out to the sides as you lower your chest and head down to the floor. Then, slide your arms by your sides, turn your head to one side, and gently rock your hips side to side if that feels like a relief for your hips and lower back.

Subscribe to Yoga for Healthy Aging by Email ° Follow Yoga for Healthy Aging on Facebook ° Join this site with Google Friend Connect

Video of the Week: Powerful Powerful Pose

This video provides instructions for practicing a more upright variation of Powerful pose (Utkatasana). Baxter add a balance challenge by having you lift your heels a few inches off the floor while remaining very steady on the balls of your feet. Feel the power!
Subscribe to Yoga for Healthy Aging by Email ° Follow Yoga for Healthy Aging on Facebook ° Join this site with Google Friend Connect

Friday Q&A: Talking to Your Doctor

Family Doctor by Grant Wood*
Q: I’ve read on your blog and heard elsewhere that if you have a medical condition or injury, you should “talk to your doctor” before practicing yoga so you know what movements you should and should not being doing. But from my experience, many doctors and even some physical therapists have no idea which physical movements yoga can include (they often just think of it as mild stretching or relaxing). I’m pretty sure it doesn’t even occur to them that I might be going upside down or twisting myself into pretzel-like positions! So I’m wondering, when I’m talking to my doctor, which questions should I be asking?

A: You’ve made a very important point. It is true that medical professionals who are unfamiliar with yoga often don’t realize the range of movements we will typically make in a well-rounded practice. So, yes, if you have had a surgery, or if you have a medical condition or an injury, you should explicitly ask your doctor or physical therapist which physical actions are safe for you and which are not safe. I recommend that, depending on which health issue you’re dealing with, you should ask all of the questions below that are relevant. (You might even want to take notes!)

  1. Can I go upside down? 
  2. Can I round my spine forward, backwards, or side to side? 
  3. Can I twist my spine? 
  4. Can I cross my legs? 
  5. Can I put pressure on this or that part of my body, such as my knees or wrists? 
  6. Can I stand on one leg? 
  7. Can I practice in bare feet? 
  8. Is my recovery from a serious illness like cancer at a place where I can safely increase my physical activity? 
  9. Is it safe for me to do a vigorous practice where I am sweating and exerting myself? Is it OK for me to hold standing poses for long periods of time that require endurance and strength? 
  10. Is it all right to stretch an injured tendon, ligament or muscle now? 
  11. Would any of the medicine I am taking interfere with my practicing-by making me dizzy, unfocused, distracted, off balance or sleepy? 
  12. If I am recovering from a contagious illness, am at risk of spreading my illness by attending a public class? 
  13. How long should I wait before returning to class or home practice? After surgery, how long do I wait before it is safe to stretch the area where my incision or scar is? If I have had a joint replacement or repair, such as a hip or knee, is there a limit to my range of motion in certain directions that I should honor? 
Obviously, depending on which health issue you are dealing with, there could be many other questions that you may want to ask you doctor. The Mayo Clinic website has a separate section called “Preparing for your appointment” for each illness, disease or condition they cover on the site. In this section, they provide examples of questions to ask your doctor at your first appointment. This could be a useful resource to look at as you prepare questions regarding your yoga practice for your own doc regarding what is going on with you.

—Baxter

Subscribe to Yoga for Healthy Aging by Email ° Follow Yoga for Healthy Aging on Facebook ° Join this site with Google Friend Connect